Monday, May 10, 2010

Plop.


Ker plunk. A huge chunk of sand plopped Right down on top of the pizza. It promised to be a good one too, artichoke and goat cheese.
The next day I went out and scraped the ceiling with my three pronged fork. A bit more sand came off but the pizza and Murphy got most of it.

Not quite


"Do you think it's done". "No, not quite" John said. "I will leave it in just a little...".

Sliding it in.


Here I am using my new peel to slide the pizza into the oven. This time the temperature, just above the oven floor, is 400 degrees F.

Lucky Find.


Here is the second Pizza. It is sitting on an aluminum peel that I found that morning at the flea market. I just missed one of those giant pizza knives, the kind with handles on either end. But I did get some restaurant style pizza pans (which I think I will use for serving, but maybe baking too) and some stainless steal condiment pans.

Flopped; but good

Here it is, the first pizza. A simple margarita style. I tried to take it out too soon and the back got scrunched a little (that is what I am picking up here). But, once it was properly cooked it came out fine. I think the oven floor was a bit too hot though as the bottom was scorched. No, make that, charred. I had set a thermocouple on the oven floor just prior to cooking and it registered 600 degrees F on my digital thermometer. I think the actual hearth temperature was probably considerably hotter though since I had the fire right on top of it four a couple of hours before moving it back to bake the pizza.

Speaking of fire, this was the second day of firing. I started, I am guessing, around 11:00 am with small fires. As the day progressed I built larger fires, mostly because I was tired of trying to split the oak that we had in our wood pile (very hard) and started using the smaller pieces of wood (about 3" in diameter). At one point I formed some clay around my thermocouple and stuck it in the fire. It was well above 1,000 degrees F. The ambient temperature inside the oven stayed around 400 degrees most of the day. I think most of the energy went to drying the clay. Around 4:00 the clay stopped steaming and the oven temperature started raising.

At this point I went inside and took out two portions of the pizza dough that I had made the day before and had raising in the refrigerator. I will post the recipe later. We put the first pizza on at 6:00 pm.

Saturday, May 8, 2010

Hail


Hail has pushed us back under the porch. We let the fire burn down and scraped the coals into and old cast iron Dutch oven and put the lid on it. The chimney cooled off quite fast so we were able to put the tarp back on. We will try again tomorrow; it is suppose to be nicer.

Earlier today I made a batch of pizza dough, in anticipation of being able to make some pizza tomorrow night. Maybe a bit optimistic but the dough will be fine in the fridge for a few days or I can freeze it.

Still Drawing


Even with the fire pushed back the chimney is still drawing.

Pushing the fire back.


As the oven heats up I can push the fire back a bit further. I will use a hoe to do this.

First Fire


It is a little hard to tell here, but the fire took right off and the chimney started to draw.

Ready to light

Looks like it stopped raining for the day, so I will light a small fire.

Ready for fire

Well, I am ready to start a small fire but it is going to rain. So we will cover it up for now. It is suppose to clear up later this afternoon.

All cleaned out

Here it is pretty well cleaned out. I used a hoe to get most of the sand off the fire bricks then swept it with a small wisk broom. You can see a bit of the newspaper, in the back, left from the first layer of bricks. The seam between this layer and the rest of the dome turned out better that I thought it would.
Dig deeper.


Here I've switched to the flat bottom shovel. The angle of the handle on the spade prevented me from reaching the back of the oven with it (the handle kept hitting the brick arch.) I used a three claw cultivator to scrape the sand off the sides and top of the oven. I could feel and hear when I reached the clay; at which time I turned the claw on its side to gently rake the sand away from the clay. I only found one soft spot that I must not of packed well enough. I used my dead blow hammer with light blows to compress it.

Digging Out

Here I am using a round spade to dig out the sand. Later I will switch to a flat bottomed shovel.

Few!


It worked!

Judgement Day

Well the oven has been drying for several days now. We have been taking the tarp off during the day and putting it back on at night in case it rains. Here I am pulling the pencils out, that I used as shims. This should allow the door frame to drop down clear of the brick arch. Keeping my fingers crossed that the whole thing does not fall apart.

Tuesday, May 4, 2010

Done


Well here it is, the first layer of the oven done. Ran out of clay (again), energy and daylight (took the picture the next morning). Notice the buttresses are not quite even but I think they will do the job.

Ran out of clay too!

Yesterday was not my day for estimates. We ended up being about one wheelbarrow load short of clay. Grumpy, tired and running out of daylight, we went and dug some more. We probably would of had enough if I hadn't made the lower walls to thick.

Looking good!


Hear I am useing a piece of plywood and a deadblow hammer to tamp the sides of the dome. Not to long after this John noticed the walls were thicker than we had planned (5" instead of 4").

Newspaper


Here John is putting wet newspaper on the sand mold. We later took it off because it kept getting in between the layers of clay and I was afraid it would make a weak spot in the oven walls.

Setting the chimney.


Hear I am checking the fit of the chimney.

Packing sand.


Here I am slapping the sand mold with a board to shape and compact it. You can see the lower wall that I started on the left side of this picture. The sand on top of it made it hard to re-establish the plane of the dome wall. I hope this does not become a problem later.

Ran out of sand.


Unfortunately, I way underestimated the amount of sand it would take to build the mold. John went to get more while I built the lower part of the clay wall (to stabilize the bottom of the mold. In retrospect, I think this was not a good idea because it was difficult to establish a strait edge on the mold when we continued adding sand.

Forming the dome


Here I am using a board to help form the lower walls of the sand mold.

Temprary Door


I decided I needed a temporary door to hold the sand back during the molding process. I held a piece of MDF up to the opening and traced the shape. Once cut, I put a couple of pieces a steel strapping on the arch frame to hold the door in. When I am ready to dig the sand out I can swivel these out of the way. Also a couple of screws will allow me to lift the door up and out of the frame. A bit of flexible masking tape on the back will keep sand from filling up my wiggle room. You can also see some sticks in the picture above that I held in place with a little clay (maybe a fist size amount, the rest is sand that I started shoveling in before I remembered to take a picture). The single one towards the back of the oven will dictate the highest point of the sand mold. The two shorter ones in the front will hold the chimney (along with a convenient protrusion on one of the bricks).

Sunday, May 2, 2010

I am no mason


Here is the finished arch. This time I am not removing the frame to test it. I will let it set up before I form the mold for the cavity and put on the first layer of clay.
I used about two thirds of a one gallon bucket of morter. I made the morter from the clay that I tested last year and found to have about 1/3 sand content. I added some extra sand and a bit of water to make it about the consistancy of peanut butter. It is not beautiful, but I think it will work.

The mason


Here I am building the arch; for the second time! The first time I forgot to put the pencils under the frame and when I pulled the frame out the whole thing came tumbling down. This time I also put a piece of metal rod, that I shaped to mach the arch, inside the top bricks and filled the holes with mud.
Before putting up the arch I used the dead blow hammer, seen in front of the arch, to set the hearth bricks. Some of the bricks where a little wider so I put them on an outside row where it won't make a difference. You can see this on the bottom right side of the picture.

Testing 123

Test layout of hearth and door bricks.

More sand

That's better.

Too low


After tamping and screeding there were some low spots.

Don't settle for less.


Still had to tamp it down.

Day Two

Two 60 pound bags of all purpose sand just filled the void for the bed underneith the hearth bricks. Another good eye? Not so quick...

Saturday, May 1, 2010

Leveling insulation

Here I am leveling off the insulation. I did amazingly well on my guess as to how much slip and how much perlite I needed. I used about one bucket of slip (about 3.5 - 4 gallons) that was about the thickness of pancake batter and four bags of perlite (5 dry quarts each) from the garden center. I poured the slip through a sieve of hardware cloth to get the gravel out but I am not sure this was necessary. The mix looked something like oatmeal cookies when it was done. This will sit over night to cure a bit.

Insulation


Perlite and clay slip are mixed together and placed between the bottles. When I dug the clay to make the slip I realized it was actually the clay that I had used for my test last year. It is from down lower than the clay we used for the bricks and has a higher clay content. Notice the difference in color. I hope the bricks are OK but David said he would go on strike if I made them over. I think they will be OK.

Fruit of the vine.

The bottles help insulate the floor. At least according to what I have read. Notice the little brick in the lower right corner of the wall. David later put it in the insulation for the archeologist's to find. I think he dated it.

Supervision

John and David rest while I mix the insulation.

Shovel ready!

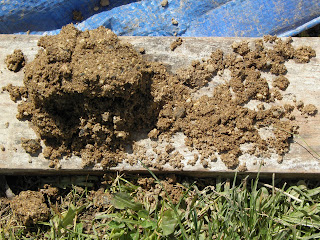
In the shovel is the clay as it came out of the ground, ready mixed with sand. The two balls to left are some test balls I made to check the strength of the dried clay/sand mix. They seem strong; they don't crumble under the pressure of pinching and are hard to scratch with my fingernail.

Sand

Here is an example of the sand that we got from a local gravel pit. For the most part, there are no stones larger then 1/4 inch and it is mostly sharp, course sand.

Where did the clay come from?


The clay came from our backyard. This is a shot of where we have been digging it. We scraped off the topsoil and set it aside.


Making Bricks


Today my friend David and I made the bricks to hold in the subfloor insulation. Last year I did a test of the clay in my back yard and found it was the perfect mixture of sand and clay. Today I dug up a bunch and it was also the perfect dampness to make bricks. We made forms out of bricks and clamped them together, then patted in the clay.

Pizza Pizza

Welcome to my blog about my earth oven.

John and I started this oven last year by pouring a slab. I might have pictures of that somewhere. If I find them I will post them later.